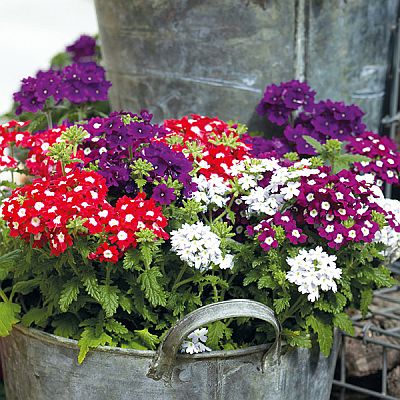
Verbena Quartz Mix pack of 15-20 seeds Imported
₹80.00
Out of stock
Email when stock available
Verbena Quartz Scientific Name : Verbena x hybrida
Common Name : Verbena
Blooming Season : Spring, Late Spring, Summer, Autumn, Late Summer
Plant Habit : Mounded
Spacing : 10 – 14″ (25 – 36cm)
Height : 8 – 10″ (20 – 25cm)
Width: 10 – 12″ (25 – 30cm)
Exposure: Sun
| Number of Seeds | 18-20 |
|---|---|
| Sowing month | Aug to Jan |
| Sowing temperature | 20-35C |
| Blooming month | Dec to April |
| Sun | Full |
Verbena Quartz Grower Information :
Seed supplied as: Raw, Primed.
Plug crop time: 4 weeks
Transplant to finish: Spring 6 to 8 weeks, Summer 5 to 7 weeks
- Quartz XP verbenas are more uniform with overall longer garden performance than competing varieties.
- Delivers a tight, 7-day flowering window, earlier and significantly better branching, and reduced internode length.
- Strong seed quality, high germination, and great young plant vigor assure superior performance in packs and 4-in./10-cm pots.
- Slightly spreading, mounded plants make brilliant beds and trail over the edges of mixed containers.
- Petunia double pink can be good a companion
Mix a homemade seed-starting soil concoction that’s well-draining and rich in organic matter. Combine one part sphagnum peat, one part sand and two parts of your backyard garden soil. Stir the three ingredients together until they are evenly mixed.
2
Sterilize your homemade potting soil to eliminate any soilborne diseases, weeds, and pests, such as bug larvae and fungus gnats. Place the soil in a baking pan and bake it at 180 degrees Fahrenheit for 30 minutes.
3
Fill a standard seed tray with the sterilized potting soil once the heated soil has cooled.
4
Sprinkle a couple of verbena seeds onto the soil surface of each individual unit in the seed tray; you do not have to cover the seed with soil.
5
Place the seed tray somewhere warm and sunny that maintains an average temperature of 65 to 70 F and where it won’t be disturbed by children or pets.
6
Mist the surface of your seed tray with a spray bottle filled with water, once or twice a day or as necessary to keep the soil consistently moist. Continue this for the entire verbena germination period, which is approximately three to four weeks.
7
Thin out your seedlings once they have developed a couple of sets of mature leaves. Identify the weakest seedling in each seed tray unit and pinch it off at its base. Avoid pulling it out, as pulling its roots out of the soil may disturb the other seedlings in the unit.
| Color | Mix |
|---|---|
| Germination Level | Easy |
| Growth Pattern | Up right Straight |
| Hybrid or Open Pollinated | Hybrid |
| Ideal location | Full sun |
| Origin Country | USA |
Be the first to review “Verbena Quartz Mix pack of 15-20 seeds Imported” Cancel reply
You must be logged in to post a review.
Related products
Winter Flower Seeds
Carnation Seeds Giant Chaubad Mix Color seeds pack of 30-40 seeds Open Pollinated
Winter Flower Seeds
Mesembryanthemum Ice plant Mix Color 40-50 seeds Open Pollinated
Winter Flower Seeds


Reviews
There are no reviews yet.